Wednesday, September 26, 2012

Community Service: Care Packages for the Military


Considering sending packages to troops?
Operation Gratitude has information for teens wishing to send letters, a Halloween Candy Buy Back, directions for creating scarves, paracord bracelets, and other ways that teens may support troops.
Check out their website.

Any Soldier is an additional source for sending mail to troops:
http://anysoldier.com/

Wednesday, September 12, 2012

Community Service: No Sew Fleece Cat Beds

We made these cat beds last year for our pet adoption fair and the shelters loved them (I'm pretty sure the kitties were happy with them, too).  It's pretty much the same idea as the people blankets, but on a smaller scale.  They also include a little stuffing in the middle.  If you have any questions, please let me know.  Unfortunately, I didn't take any pictures of them.
Thanks!
Cara

No-Sew Fleece Cat Beds

Supplies needed:
Fabric scissors

Yard Stick
2 pieces of fleece fabric, 25 inches by 20 inches (can be the same pattern of fleece or you can mix and match colors and patterns)
1 piece of quilt batting (batting that can be unrolled), 19 inches by 14 inches
3 x 3 inch cardboard square

Directions:
Match the two pieces of fleece together (wrong sides touching and right side facing out) and cut a 3x3 inch square from each corner.  Use the cardboard square as a guide. 

After you have cut out the corners, lay the yard stick across one of the shortest edges of the fabric from the top of each corner. Using the yard stick as a guide cut one inch wide fringe in the edge of the fabric all the way across.  I like to cut the fringe on both pieces of fabric at the same time so they will line up when you tie them together.
Do the same on the other edges of the fabric. 

After you have cut the fringe, insert the batting between the two pieces of fleece, centering it and aligning the fringe pieces on each side of the fleece.  The edge of the batting should come up to where the fringe starts.  If the piece of batting is too large in places, trim it.  Take one piece of fringe from each side of the fleece and tie them together in a knot.  I like to tie them twice so they don’t come undone.   Make sure the knot is as close to the edge of the fabric as possible.   The knot should be secure, but don’t pull it too tight.
Once all of the fringe pieces are tied together, lay the blanket on a flat surface and gently stretch out each side until it lays flat. 

Your blanket is now complete!

(You can also make this as a single layer blanket without the batting)

Community Service: Pet Toys

Fleece Dog Toy
Fleece Catnip Toy
Catnip Mouse
 Hello again!  For those that were interested, here are the directions for the pet toys we made.  If anyone would like me to send them a copy of the handout itself, please email me.  Thanks! Cara

Catnip Mouse
Materials needed:
Dried catnip
Small child’s sock
Fiberfill
Yarn
Permanent Marker
Felt
Non-toxic glue
Scissors
1.       Place a pinch of the catnip in the toe of the sock. 
2.       Insert a handful of the fiberfill.
3.       Add a pinch more catnip.
4.       Tie the sock closed with yarn.  Make sure it is closed tightly.
5.       Draw a face with permanent marker.
6.       Cut out felt ears and glue them on.
Taken from Family Fun Magazine: www.familyfun.go.com/crafts/catnip-mouse-660939
No-Sew Fleece Cat Toy

Materials needed:
Fleece material
Dried catnip
Scissors
Ruler
1.       Take a 4”x7” square of fleece and lay it on a flat surface in front of you.  The longest edge should be facing you.
2.       Place a teaspoon of catnip in the center of the fleece but towards the long edge that is closest to you.
3.       Fold the long edge that is closest to you over the catnip and roll it tightly.
4.       Tie a knot in the middle of the fleece where the catnip is.
5.       Trim the ends to desired length.
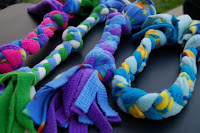
Fleece Rope Dog Toy
Materials needed:
Fleece material
Scissors
Rubber bands
1.       Take 3 strips of fleece cut to the same width and length and stack them one of top of each other.  For larger toys, use strips that are about 4 inches wide and 30 inches in length.  For smaller toys, use strips that are about 2 inches wide and 15 inches in length.
2.       Rubber band one end of the bunch together.  Place the rubber band about four inches from the end.  If you are using a short strip of fleece (15 inches or less), leave about 3 inches.
3.       Hold the rubber-banded end between your knees or have a friend hold that end for you.
4.       Braid the three strands together.   Make sure the braid is nice and tight so it’s harder for the dog to get his teeth through it.  Leave the same amount of unbraided fleece as the first end.
5.       Wrap another rubber band at the end of your braid where you just finished.
6.       Make a knot where each rubber band is located.  Try to get the knot as close to where the rubber band is located.  Snip the rubber band (make sure not to cut the fabric) and pull the rubber band out.  Pull the knot tight.
7.       Trim the unbraided ends of the toy so they are about the same length.  Leave at least 3 inches of unbraided fleece on each end. 
8.       Tie a knot in the center.  If the rope is long, tie two knots in different spots.


Community Service: No Sew Fleece Blanket Directions


Hi everyone! If you are interested, here are the directions for the No Sew Fleece Blankets we made for the Suffolk County Coalition Against Domestic Violence. We rolled the completed blankets up, tied them with yarn and attached a note card just to make the presentation a little nicer.  You can also make these blankets with two layers of fleece, but the single layer is faster to make and you get twice as many blankets out of the same amount of fleece.  If it's really thin fleece, you might want to do two layers.  If you would like me to send you a copy of the instructions with photos included for demonstration, please send me an email at cara.perry AT sachemlibrary.org  Thank you!
~ Cara

No-Sew Fleece Blankets
Supplies needed:

Fabric scissors
Yard Stick
1 ½ yards fleece fabric that is 60 inches wide
6 x 6 inch cardboard square

Directions:
Lay the fabric out and cut a 6x6 inch square from each corner.  Use the cardboard square as a guide. 

After you have cut out the corners, lay the yard stick across one of the shortest edges of the fabric from the top of each corner as illustrated below.  Make sure the side with the measurement markings is facing towards you. Using the yard stick as a guide cut one inch wide fringe in the edge of the fabric all the way across.
Do the same on the other edges of the fabric.  When you cut the fringe on the longer edge of the fabric, the yard stick will be too short to reach across the fabric all at once.  Use the 6X6 cardboard square as a guide with the yard stick to make sure your fringe will be the same length all along the edge of the fabric.

After you have cut the fringe on each side, tie each piece of fringe in a knot (like you are tying off a balloon).  Make sure the knot is as close to the edge of the fabric as possible.   The knot should be secure, but don’t pull it too tight.
Once you have made a knot with each piece of fringe, lay the blanket on a flat surface and gently stretch out each side until it lays flat. 

Your blanket is now complete!

Thursday, September 6, 2012

Community Service: Covered Notebook


Martha has created a covered notebook craft. View the steps here.  Great video Martha!

Community Service: Disclaimer Suggestion

Catherine suggested that when listing upcoming community service opportunities, libraries might want to include a disclaimer advising all registrants to check with their individual organization to determine if the program would meet the community service requirements for that organization.  Maybe something similar to this:

"Please check with your organization to determine if this will qualify for your community service requirement."

Wednesday, September 5, 2012

Community Service: Sachem Fall Festival


Sachem Public Library teens enjoy volunteering at the library's annual Fall Festival.
This year over 60 teens worked throughout the day. Cara organized the teens into two shifts: one morning and one afternoon shift.
Teens painted faces, ran the bean bag toss (awesome giant pumpkin created by Andrew), assisted with the sack races, and even performed.
Excellent event and a terrific way to involve teens.